
How to Create a Fun and Relaxing Maze Puzzle for Seniors: A Step-by-Step Guide
Creating maze puzzles is a wonderful and creative way to entertain and engage older adults. Whether you’re making puzzles for a loved one, a daycare centre, or for publishing, maze puzzles offer cognitive stimulation, stress relief, and most importantly—fun!
Here’s a simple step-by-step guide to help you design and build a maze puzzle that seniors will love.

Step 1: Understand Your Audience – Designing for Seniors
When creating maze puzzles for seniors, it’s important to consider their unique preferences, visual needs, and cognitive goals. A puzzle that’s enjoyable for one age group may feel too busy or overwhelming for another. Here’s how to tailor your puzzle for older adults:
Accessibility Matters
- Use large, clear lines: Thin or overly intricate mazes may be difficult to see, especially for those with visual impairments.
- Opt for high-contrast designs: Black lines on white paper work best for clarity.
- Avoid clutter: Keep backgrounds plain and layouts simple.
Pacing and Difficulty
- Seniors enjoy a relaxed pace. Mazes should be challenging enough to spark interest, but not so complex that they feel frustrating or fatiguing.
- Aim for light to medium difficulty. Use gentle turns and logical paths instead of tight loops or confusing intersections.
Emotional Engagement
- Puzzles can evoke positive emotions when tied to familiar or nostalgic themes.
- Incorporate friendly, familiar motifs: gardens, teapots, pets, beach huts, knitting baskets, or village life.
Social Benefits
- Mazes can be a shared activity—printed in activity books, handed out at community centres, or solved in pairs.
- Add a conversation prompt on the page (e.g., “What was your favourite garden activity as a child?”) to make it more interactive.


Step 2: Choose Your Maze Style – Simple, Visual, and Enjoyable
Now that you understand your audience, it’s time to choose the maze layout style that best suits their needs and interests.
1. Classic Square or Rectangular Grid (Best for Beginners)
- The most recognizable and friendly format.
- Easy to solve with the eyes or a pencil.
- Perfect for printing and placing in puzzle books or activity packets.
- Can range from 8×8 (very easy) to 15×15 (moderate) squares.
Good For: Everyday puzzles, first-time creators, relaxing cognitive engagement.

2. Circular or Spiral Maze
- Offers a more visual twist on the classic maze.
- The Start is at the outer ring, and the Finish is in the center (or vice versa).
- Adds novelty but should be kept visually clean.
Good For: Thematic mazes (e.g., sunflower, clock face), moderate difficulty.

3. Thematic or Shaped Mazes
- Mazes shaped like hearts, animals, or objects add visual charm.
- Requires more time to design but can be delightful for holidays, birthdays, or special themes.
- Best used sparingly or for special edition puzzles.
Good For: Creative projects, puzzle books with a seasonal or nostalgic theme.

Maze Style Tip:
If you’re using online tools or templates:
- Look for “maze generators” that let you choose path width, shape, and complexity.
- Ensure your chosen tool allows editable Start and Finish positions so you can place them logically for your design.
Step 3: Sketch Your Maze Layout – Start with a Clear Framework
Creating a maze starts with a blank grid, but your framework will shape the entire experience for your solver. At this stage, you’re laying the foundation for both creativity and clarity.
Choose Your Design Method:
You can either:
- Draw by hand using graph paper or blank paper.
- Use digital tools like online maze generators or drawing software.
If Drawing by Hand:
- Take a sheet of graph paper (A4 or letter size is ideal).
- Lightly draw a grid—10×10 or 15×15 blocks work well for seniors.
- Use a pencil at this stage so you can erase and adjust paths easily.
- Leave space around the edges if you’d like to add decoration or a title.

If Using a Maze Generator:
Try these beginner-friendly tools:
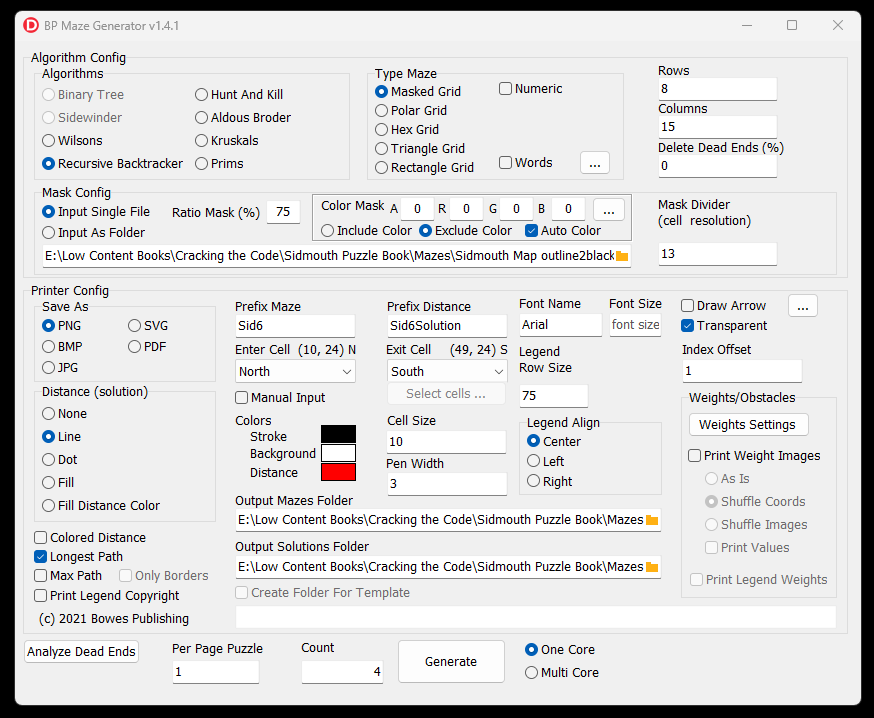
The Maze Generator
Recommended From Bowespublishing – Full commercial rights. Create mazes of all difficulty levels. Bulk create mazes with multiple algorithms. Export in SVG (vector), PNG, BMP, JPG & PDF.
- Best For: All maze creators.
- Price: £70 (look for sales offers).
- Website: bowespublishing.gumroad.com/
Maze Generator
An online tool for creating mazes of different complexities and shapes. Need a commercial licence to use in books.
- Best For: Quick and customizable mazes.
- Price: Free
- Website: mazegenerator.net
Krazydad Mazes
Offers printable maze puzzles in various difficulty levels and styles. Need permission from Krazydad to use in your own puzzle book
- Best For: Free and diverse maze designs.
- Price: Free
- Website: krazydad.com/mazes
These tools let you:
- Choose the size and complexity.
- Download or print clean, scalable designs.
- Often customize the entry and exit points.
Define the Start and Finish Points:
- Place the Start point in the top left or bottom left.
- Place the Finish point in the opposite corner for balance.
- Clearly label these points with bold letters or arrows.
Example: Start (top left) → Finish (bottom right)
Step 4: Create the Solution Path – The Heart of the Maze
This is the fun part—you’re building the main path from the Start to the Finish that will eventually be hidden among distractions. Keep it senior-friendly: engaging, but not overly complex.
Build the Correct Path:
- Begin at your Start point.
- Create a path that winds gently toward the Finish.
- Avoid straight-line shortcuts.
- Add a few gentle turns, but not too many tight corners.
- Make sure there are no accidental dead ends on the main path.
- Keep the width consistent—one clear path cell throughout the maze.
- Use a highlighter or different color pencil to distinguish this correct route while you’re still in the design phase.
Design Tip:
Imagine the path as a walking trail: interesting and scenic, but not exhausting.
Want to add a relaxing theme? Shape the path to resemble:
- A flower vine
- A gentle wave
- A winding garden path
Step 5: Add Dead Ends and Distractions – Make It Just Challenging Enough
Now it’s time to hide the real solution by adding false paths, twists, and gentle trickery. This is where you balance fun and difficulty.
Add Branches and Dead Ends:
- Look at intersections and corners in your main path.
- Add side paths that veer off, then stop a few cells later.
- Some can loop back toward the main path (but not connect to it).
- Avoid extremely complex tangles—2 to 4 dead ends is perfect for a puzzle aimed at seniors.
Keep It Balanced:
- Alternate long and short dead ends.
- Vary the position of distractions to keep the solver engaged.
- Don’t place all the dead ends at the beginning—spread them out.
Tip for Senior-Friendly Mazes:
- Keep false paths short and avoid tight turns or too many branches off one node.
- Dead ends that go 3–5 cells deep are long enough to be interesting, but not confusing.
Add Personality:
Want to make the puzzle more fun?
- Name the paths or areas (e.g., “Teapot Trail” or “Sunflower Loop”).
- Add small icons or doodles at intersections (flowers, birds, etc.) to make it cheerful.

Step 6: Style and Personalize the Maze – Add Clarity and Charm
Once the structure of your maze is complete, it’s time to make it visually friendly and appealing—especially for older adults who may appreciate both readability and a touch of personality.
Improve Visual Clarity:
- Thicken the walls of the maze using a fine marker or bold digital lines. Ideal line thickness: 1.5–2pt if designing digitally.
- Use large cells: If hand-drawing, aim for at least 1 cm per cell.
- Make sure paths are evenly spaced so the puzzle doesn’t look cramped.
- Leave a generous margin around the maze for neatness and easier handling.
Label Start and Finish Clearly:
- Write “START” and “FINISH” in uppercase bold text.
- Use a simple arrow or coloured dot to draw attention.
- You can also add text like:
“Can you help Granny find her way back to the garden shed?”
– This light storytelling touch can make the maze more engaging.
Add Decorative Elements:
While you want to avoid clutter, light decorations can bring warmth and personality to your maze.
Ideas for senior-friendly themes:
- Garden theme: Add flowers, bees, or watering cans in corners.
- Nature theme: Use birds, butterflies, or trees.
- Tea time: Add teapots, biscuits, or knitting balls.
- Seasonal: Pumpkins for autumn, snowflakes for winter.
Pro Tip: If designing for a whole puzzle book, use a consistent style or recurring characters throughout.
Tools for Styling:
- Canva or Kittl: For layout, titles, borders, and decorations.
- Affinity Designer or Adobe Illustrator: For precise custom designs.
- Free clipart sites: Openclipart, Pixabay
Step 7: Test the Maze – Ensure It’s Solvable and Fun
Testing your maze ensures it offers a fair and enjoyable challenge. Even a beautiful maze can frustrate users if it’s unsolvable or confusing.
Do a Full Walkthrough:
Solve your own maze with a pencil or pen (not just in your head).
Look for:
- Dead ends that accidentally connect to the main path.
- Ambiguities or “traps” that feel unfair or too complex.
- Paths that are too obvious, making it boring.
Ask Someone to Try It:
Let a senior friend, family member, or neighbour give it a go. Watch for signs of:
- Confusion or hesitation.
- Difficulty reading lines or understanding direction.
- Enjoyment—do they smile, laugh, or seem interested?
Adjust Accordingly:
Remove or simplify overly tricky branches. Clarify confusing sections with visual tweaks. Don’t be afraid to redraw a section—part of the creative process!
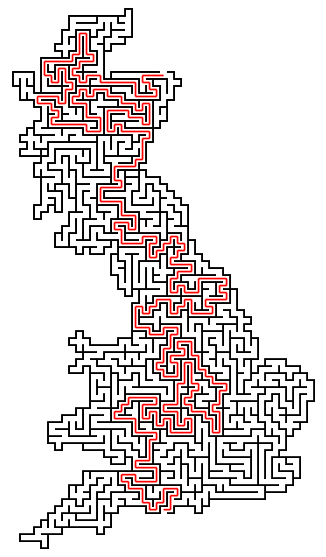
Optional: Create a Solution Key Trace the correct solution path in a different colour or dashed line. Save this version to include as an answer key in a puzzle book or printable PDF.
Step 8: Print and Share – Bring Your Maze to Life
You’ve designed, decorated, and tested your maze—now it’s time to share it with the world!
Print Your Puzzle:
- Use A4 or Letter-sized paper for ease of printing.
- Opt for high-contrast black and white unless you’re using colour deliberately.
- Save digital designs in PDF format for crisp printing.
- Print on thicker paper (120gsm+) if you want a sturdier, activity-book feel.
Package It Up:
Include the maze title at the top (e.g., “The Garden Stroll Maze”). Add a short description below the title such as “Follow the winding path through the flowers to reach the garden bench!” Include the solution on a separate page if distributing to others.
Share Your Puzzle:
- Add it to a senior activity book or newsletter.
- Offer it as a free download on your website or blog.
- Post it on Pinterest, Facebook, or Instagram for puzzle lovers.
- Bundle several mazes into a printable collection and sell on Etsy or Amazon KDP.